Embedding images in an email (APEX Mail #5)

Everything you need to know about sending emails with Oracle APEX can be found in this series. The fifth post will be a bit more exciting and offers different approaches, which we would like to explain here.
#5 Embedding images to an email
If you want to embed or display images in an email, there are several options. The easiest way is to use the <img> tag, which can be used to embed an image in an HTML page. For example:
<img src="https://www.oracle.com/a/ocom/img/dc/em/oracle-apex.png" alt="APEX Logo">
However, it is recommended to avoid references to images with the <img> tag. Remember that the images must be accessible to the recipient's email client in order for them to see the image. In this way, images are not attached to the email but are referenced in the email.
To work around this problem, we can attach the image to the email and then reference it with HTML tags in the email template. This will embed the image when the email is opened. CID (Content-ID) has been used for quite some time for sending images via email and is relatively easy to understand.
Note, that embedding images in this way will increase the size of your entire email, which can hinder deliverability.
Let's start with an APEX 21.2 environment first
There is good news because if you use APEX 21.2 it is possible to send attachments declaratively as inline-attachments. For this, a new parameter "p_content_id" has been added to the "apex_mail.add_attachment" procedure. So, let's see how it works.
And again, we'll use the demo application we've already created in the previous blogs so we don't have to describe everything from scratch.
First, we add a new email template to this application. The easiest way is to copy the existing "Hello World" template (btw. another great feature of APEX 21.2). To do this, go to "Other Components" in the "Shared Components" section, select "Email Templates" and click "Copy". Then select "Hello World" under "Copy Email Template" and name it for example "Hello Image" ("New Static Identifier" will be generated automatically).
When this is done, the template must be edited. For that, go to the template details and replace the header code with the following HTML code, for example, so that the image and the title are displayed in the header.
<H1>Hello Image!</H1>
<img src="cid:apex_logo.png" alt="APEX Logo" >
As you can see here, we also use the <img> tag, but instead of specifying a URL as the source, we specify a content-id "cid:apex_logo.png".
To use the new template, we need another process on page 1. So go to page 1 and copy the process "Send email" and name the copy e.g. "Send mail with Image". Then change the email template to "Hello Image" and add the following SQL code to "Attachment SQL".
select blob_content,
filename,
mime_type,
'apex_logo.png' as content_id
from apex_application_files
where flow_id = :APP_ID
and filename = 'apex_logo.png'
This example again uses the static-file from the previous blog. Please adjust it if you use a different file.
The column "content-Id" is new in APEX 21.2. If the value of the content_id is non-null then the associated file will be marked as being attached inline. And this is exactly what we need here ;-)
Finally, we will set the "Server Side Condition" so that this process is only executed when the "Send" button is clicked and the "Hello Image" email template is selected. Therefore, go to "Server-Side-Condition" and select "Send" as "When Button Pressed". Then set "Item = Value" as the type, "P1_EMAIL_TEMPLATE" as the item, and "HELLO_IMAGE" as the Value. To be consistent, do the same for the existing "Send Email" process and enter "HELLO_WORLD" as the value here.
So, that's it... let's run the application now and try to send an email with an image.
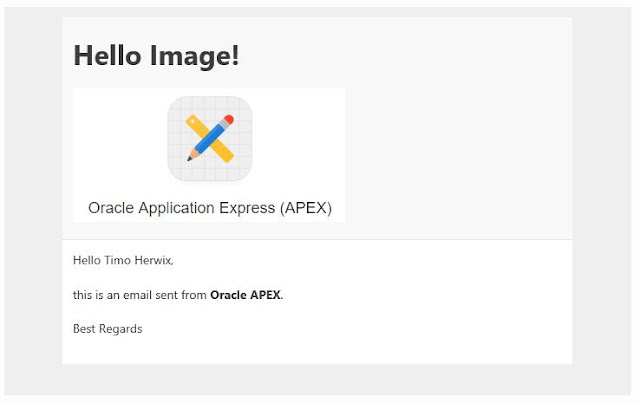
The email should look like this:
The email should look like this:
Next, we will look at how it works with an older environment
If you have an APEX version older than 21.2 in your environment, you will have to do a little bit more.
For this, we use the "apex_mail.add_attachment" procedure as we also did when adding an attachment to an email. Then the images are referred in the email content using the attached filename. For example, if you want to add the image "apex_logo.png", you need to attach this image file to the email, first. Then you can reference the attached image in your email template using the syntax described above.
<img src="cid:apex_logo.png" alt="APEX Logo" >
So, the first thing we need is the email template. If "Hello Image" has not been created, please create it as described above.
Next, we need a process to send the email with the image when we hit the "Send email with API" button.
Therefore, switch to Processes in the tree structure and copy the process "Send email with API" and name the copy e.g. "Send mail with Image (API)".
In this case, the PL/SQL code does not need to be changed. As you can see here, we have already attached an image here and sent the email.
declare
l_id number;
begin
-- this functions sends an email message from a Oracle APEX application
-- this function returns a NUMBER
-- the NUMBER returned is the unique numeric identifier associated with the mail message
l_id := apex_mail.send(
-- Valid email address to which the email is sent
p_to => :P1_TO,
-- Email address from which the email is sent
p_from => :APP_EMAIL,
-- Static identifier string, used to identify the shared component email template
p_template_static_id => :P1_EMAIL_TEMPLATE,
-- JSON string representing the placeholder names along with the values, to be substituted
p_placeholders => '{' ||
' "CONTACT":' || apex_json.stringify( :P1_CONTACT ) ||
'}'
);
-- in this example an image from the "Static application files" is used
-- the filename that is attached must match with the filename that is specified as src
-- if the filename does not match the image will be attached as a normal attachment
for rec in (
select filename, blob_content, mime_type
from apex_application_files
where flow_id = :APP_ID
and filename = 'apex_logo.png'
)
loop
apex_mail.add_attachment(
p_mail_id => l_id,
p_attachment => rec.blob_content,
p_filename => rec.filename,
p_mime_type => rec.mime_type);
end loop;
-- Oracle APEX stores unsent email messages in a table named APEX_MAIL_QUEUE.
-- You can manually deliver mail messages stored in this queue to the
-- specified SMTP gateway by invoking the APEX_MAIL.PUSH_QUEUE procedure.
apex_mail.push_queue;
end;
We should only set the "Server Side Condition" as described before so that this process is only executed when the "Send API" button is clicked and the "Hello Image" email template is selected. To do this, go to "Server Side Condition" and select "Send API" as "When Button Pressed". Then set "Item = Value" as the type, "P1_EMAIL_TEMPLATE" as the item, and "HELLO_IMAGE" as the value.
And again, to be consistent, do the same for the existing process "Send Email with API" and enter here "HELLO_WORLD" as a value.
That's it... start the application and try to send an email with an image via the API.
Again, the email should look like this:
Again, the email should look like this:
Note: Both processes still have a difference. In APEX environments that are older than 21.2, attachments are always added with the Content-Disposition as attachment. Now in 21.2, APEX will specify Content-Disposition as inline for those attachments. This enables more reliable embedding of images in email content and works in all email clients that support the cid:schema approach.
Feel free to let us know if these tips and tricks helped you.
If you have questions or suggestions, please leave us a comment ;-)


4 Comments:
Will it work if we call APEX template in procedure and Send mail via REST API?
Ive noticed that these mails with images display nicely whatever mail client is used EXCEPT on IOS, where the attachments display inline but ALSO appear as regular attachments below the mail'. That causes issues if you want to forward the mail from IOS. Ive tried many things but not yet come up with a solution. Any ideas?
I don't have these problems with my devices...iPhone 11 with iOS 16 and an iPad with iOS 15. I can't get it reproduced.
Give it a try ;-)
Post a Comment
Note: Only a member of this blog may post a comment.
Subscribe to Post Comments [Atom]
<< Home