Thursday, January 27, 2022

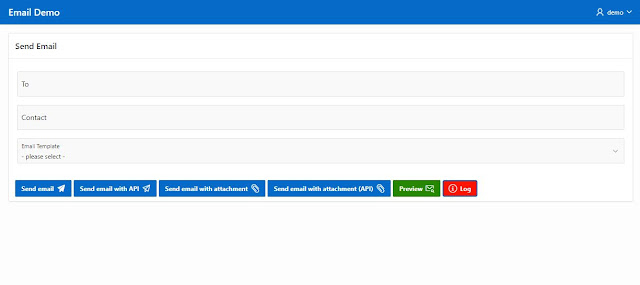
Advanced email techniques (APEX Mail #9)


We have described the most important things about "Emails with Oracle APEX" in the previous blogs. To wrap up this series now, we would like to list a few more techniques, tips, and tricks that we have come across over time. So let's move on to the last topic number nine.

#9 Advanced email techniques

First of all, it should be mentioned that the following points are only based on experience and do not necessarily have to be implemented. But maybe it will help you to create your own email templates. The biggest problem with HTML emails is that the rules for HTML have not yet been standardized for all email clients. This sets limits and calls for creativity during development and should be tested as best as possible. Ideally with as many clients as possible.


Use HTML Tables

It is better to use a <BR> or <Table> tag instead of <P> or <SPAN>. This avoids inconsistent spacing since spacing has different margins in each email client. The safest way to have consistent spacing is to use tables. If you still need to use a <SPAN> tag, end it with a <BR> tag.


Use Inline CSS

If you're wondering why your CSS isn't working, it could be because most email clients remove the <header> of an HTML page so that external style sheets aren't rendered properly. As a solution, you can put a CSS inline with each element instead. Manage links by using an inline style for each link color. Add the colors in hexadecimal, using the longhand version #000000 instead of #000. Keep in mind that not every CSS element is supported in every email client.

In the following HTML code example, you can see how tables and inline CSS can be used:

 1
 2
 3
 4
 5
 6
 7
 8
 9
10
11
12
13
14
15
16
17
18
19
20
21
22
23
24
25
26
27
28
29
30
31
32
33
34
35
36
37
38
39
40
41
42
43
44
45
<table border="0" width="100%" cellspacing="0" cellpadding="0" style="padding: 20px 0 30px 0;">
 <tbody>
  <tr>
   <td style="color: #153643; font-family: Arial, sans-serif; font-size: 24px;"><strong>Lorem ipsum dolor sit amet!</strong></td>
  </tr>
  <tr>
   <td style="color: #153643; font-family: Arial, sans-serif; font-size: 16px; line-height: 20px; padding: 20px 0 30px 0;">Lorem ipsum dolor sit amet, consectetur adipiscing elit. In tempus adipiscing felis, sit amet blandit ipsum volutpat sed. Morbi porttitor, eget accumsan dictum, nisi libero ultricies ipsum, in posuere mauris neque at erat.</td>
  </tr>
  <tr>
   <td>
    <table border="0" width="100%" cellspacing="0" cellpadding="0">
     <tbody>
      <tr>
       <td valign="top" width="260" style="padding: 20px 20px 20px 20px;">
        <table border="0" width="100%" cellspacing="0" cellpadding="0">
         <tbody>
          <tr>
           <td><img style="display: block;" src="https://bit.ly/3rmktSc" alt="" width="100%" height="auto" /></td>
          </tr>
          <tr>
           <td style="color: #153643; font-family: Arial, sans-serif; font-size: 16px; line-height: 20px; padding: 25px 0 0 0;">Lorem ipsum dolor sit amet, consectetur adipiscing elit. In tempus adipiscing felis, sit amet blandit ipsum volutpat sed. Morbi porttitor, eget accumsan dictum, nisi libero ultricies ipsum, in posuere mauris neque at erat.</td>
          </tr>
         </tbody>
        </table>
       </td>
       <td style="font-size: 0; line-height: 0;" width="20">&nbsp;</td>
       <td valign="top" width="260" style="padding: 20px 20px 20px 20px;">
        <table border="0" width="100%" cellspacing="0" cellpadding="0">
         <tbody>
          <tr>
           <td><img style="display: block;" src="https://bit.ly/3IdtjsA" alt="" width="100%" height="auto" /></td>
          </tr>
          <tr>
           <td style="color: #153643; font-family: Arial, sans-serif; font-size: 16px; line-height: 20px; padding: 25px 0 0 0;">Lorem ipsum dolor sit amet, consectetur adipiscing elit. In tempus adipiscing felis, sit amet blandit ipsum volutpat sed. Morbi porttitor, eget accumsan dictum, nisi libero ultricies ipsum, in posuere mauris neque at erat.</td>
          </tr>
         </tbody>
        </table>
       </td>
      </tr>
     </tbody>
    </table>
   </td>
  </tr>
 </tbody>
</table>

The HTML body should look like this:


Use LOOPS for mass distribution

If you need to send many emails at once, you can solve this with a loop. So write a SQL query that selects all recipients and execute the procedure or function "apex_mail.send" in the loop. You can find a very good description here (Creating Email Campaign App with Oracle APEX).


A tiny example could be the following code snippet:

 1
 2
 3
 4
 5
 6
 7
 8
 9
10
11
12
13
begin
    for rec in (select contact_name, contact_email from contacts) 
    loop        
        apex_mail.send (
        p_to                 => rec.contact_email,
        p_template_static_id => 'HELLO_WORLD',
        p_placeholders       => '{' ||
        '    "CONTACT":'            || apex_json.stringify( rec.contact_name ) ||
        '}' );
    end loop;

    apex_mail.push_queue;
end;

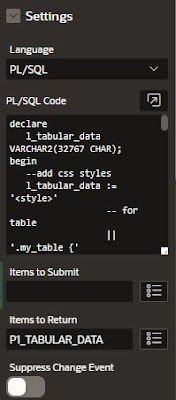
Use different SQL techniques for dynamic content

As we explained in a previous blog, dynamic HTML content can be created by using PL/SQL. This can be very handy in many ways to make the content of your email dynamic, personalized, or even random.

For example, the following SQL snippet can be used to display a personalized order.

 1
 2
 3
 4
 5
 6
 7
 8
 9
10
11
12
13
14
15
16
17
18
19
20
21
22
23
24
25
26
27
28
29
30
31
32
33
34
35
36
37
38
39
40
41
42
43
44
45
46
47
48
49
50
51
52
53
54
55
56
declare
   l_order_table VARCHAR2(32767 CHAR);
begin
   l_order_table := l_order_table || '<table style="font-family: arial, sans-serif; border-collapse: collapse; width: 100%;">' 
                 || '<tr>'
                 || '<th style="background-color: #eeeeff; border: 1px solid #dddddd; text-align: left; padding: 8px" >Position</th>'
                 || '<th style="background-color: #eeeeff; border: 1px solid #dddddd; text-align: left; padding: 8px" >Article</th>'
                 || '<th style="background-color: #eeeeff; border: 1px solid #dddddd; text-align: left; padding: 8px" >Quantity</th>'
                 || '<th style="background-color: #eeeeff; border: 1px solid #dddddd; text-align: left; padding: 8px" >Unit price</th>'
                 || '<th style="background-color: #eeeeff; border: 1px solid #dddddd; text-align: left; padding: 8px" >Total price</th>'
                 || '</tr>';

   for rec in (
       select ROW_NUMBER() OVER (ORDER BY article) AS position,
              article, 
              sum(quantity) as quantity, 
              sum(price) as price, 
              sum(quantity * price) as total
         from 
         (
         select 'Article 1' as article, round(dbms_random.value(1, 10),0) as quantity, round(dbms_random.value(1, 100),2) as price from dual
         union
         select 'Article 2' as article, round(dbms_random.value(1, 10),0) as quantity, round(dbms_random.value(1, 100),2) as price from dual
         union
         select 'Article 3' as article, round(dbms_random.value(1, 10),0) as quantity, round(dbms_random.value(1, 100),2) as price from dual
         union
         select 'Article 4' as article, round(dbms_random.value(1, 10),0) as quantity, round(dbms_random.value(1, 100),2) as price from dual
         union
         select 'Article 5' as article, round(dbms_random.value(1, 10),0) as quantity, round(dbms_random.value(1, 100),2) as price from dual
         )
        group by rollup(article)
   )
   loop
      if rec.article is not null then
        l_order_table := l_order_table || '<tr>'
                        || '<td style="border: 1px solid #dddddd; text-align: left; padding-left: 8px;">' || rec.position || '</td>'
                        || '<td style="border: 1px solid #dddddd; text-align: left; padding-left: 8px;">' || rec.article || '</td>'
                        || '<td style="border: 1px solid #dddddd; text-align: right; padding-left: 8px;">' || rec.quantity || '</td>'
                        || '<td style="border: 1px solid #dddddd; text-align: right; padding-left: 8px;">' || rec.price || '</td>'
                        || '<td style="border: 1px solid #dddddd; text-align: right; padding-left: 8px;">' || rec.total|| '</td>'
                        || '</tr>';
      else 
        l_order_table := l_order_table || '<tr>'
                        || '<td style="background-color: #eeeeff; border: 1px solid #dddddd; text-align: left; padding-left: 8px; font-weight: bold;">Sum</td>'
                        || '<td style="background-color: #eeeeff; border: 1px solid #dddddd; text-align: left; padding-left: 8px; font-weight: bold;"></td>'
                        || '<td style="background-color: #eeeeff; border: 1px solid #dddddd; text-align: right; padding-left: 8px; font-weight: bold;"></td>'
                        || '<td style="background-color: #eeeeff; border: 1px solid #dddddd; text-align: right; padding-left: 8px; font-weight: bold;">' || rec.price || '</td>'
                        || '<td style="background-color: #eeeeff; border: 1px solid #dddddd; text-align: right; padding-left: 8px; font-weight: bold;">' || rec.total || '</td>'
                        || '</tr>';
      end if;                  
   end loop;
   
   l_order_table := l_order_table || '</table>';

   :P1_ORDER_TABLE := l_order_table;
end;


And this is how the email output could be:


So, as you have seen and learned, there are many ways to create and send emails. However, you should always pay attention to some details and think in advance who the recipient group will be and what email clients you can expect.


Here is the demo app for reference.


Quellen:

Labels: , , ,

Monday, January 24, 2022

Including a link in an email to an APEX App (APEX Mail #8)


As already mentioned, here you will find everything you need to know about sending emails with Oracle APEX. Let's continue with topic number eight.

#8 Including a link in an email to an APEX App

In this blog post, we would like to show you how to include a hyperlink that redirects you to an APEX application in an email. This can be a link text, button, or whatever you like. Just make sure that your expected email clients support your solution.


Let´s start by creating a demo app

Create a new application in the App Builder. In the wizard, you can name your application "Email Demo" for example. Our application is now ready to add more components. The home page has no regions at the moment.

Now our application is ready to add a region, some components, and a process to send emails.

First, add a "Static Content" region to your "Content Body" and name it for example "Send Email".
Then we need to have the following items:
  • P1_TO as Text Field (This will have the address of the email recipient)
  • P1_CONTACT as Text Field (This will have the name of the recipient)
Finally, the page needs a button to send an email. So add a button "Text and Icon (Hot)" to the "Close" position. Name the button "SEND" and use e.g. "fa-send" as the icon and "Send email" as the label.


Create a process to send the email

Next, we need a process to send an email when we hit the "SEND" button.

Therefore, switch to Processes in the tree structure and create a new process. For example, name it "Send mail" and select the type "Execute Code". 

Under Source, enter the following PL/SQL Code:

 1
 2
 3
 4
 5
 6
 7
 8
 9
10
11
12
13
14
15
16
17
18
19
20
21
22
23
24
25
26
27
28
29
30
31
32
33
34
35
36
37
38
DECLARE 
    l_body_html clob;
    l_body      clob;
BEGIN
    l_body := 'Hello '|| :P1_CONTACT || ','||UTL_TCP.crlf;
    l_body := l_body || 'this is an email sent from Oracle APEX.'||UTL_TCP.crlf;
    l_body := l_body || 'Please click the following link to view your email log.'||UTL_TCP.crlf;
    l_body := l_body || apex_mail.get_instance_url || APEX_UTIL.PREPARE_URL('f?p=&APP_ID.:81:::::P81_MAIL:&P80_TO.') ||UTL_TCP.crlf;
    l_body := l_body || 'Best Regards';
 
    l_body_html := '<p>Hello '|| :P1_CONTACT || ',</p>'
                || 'this is an email sent from <strong>Oracle APEX</strong>.<br />'
                || 'Please click the button to view your email log.<br />'
                || '<table border="0" cellspacing="0" cellpadding="0">'
                || '    <tr>'
                || '        <td>&nbsp;</td>'
                || '    </tr>'
                || '    <tr>'
                || '        <td style="padding: 12px 18px 12px 18px; border-radius:10px; background-color: #056ac8;" align="center">'
                || '            <a href="' || apex_mail.get_instance_url || apex_page.get_url(p_page => 2, p_items => 'P2_MAIL',p_values => :P1_TO) || '" target="_blank" style="font-size: 15px; font-family: Helvetica, Arial, sans-serif; font-weight: bold; color: #ffffff; text-decoration: none; display: inline-block;">Click here</a>'
                || '        </td>      '
                || '    </tr>'
                || '    <tr>'
                || '        <td>&nbsp;</td>'
                || '    </tr>'
                || '</table>'
                || 'Best Regards';
 
    apex_mail.send(
        p_to        => :P1_TO,
        p_from      => :APP_EMAIL,
        p_body      => l_body,
        p_body_html => l_body_html,
        p_subj      => 'Including a link in an email to an APEX App'
    ); 
 
    apex_mail.push_queue;
END;

Finally, enter the success and error message and the server-side condition when the process should be executed.

Success Message: Email sent
Error Message: Email sent failed!
When Button Pressed: SEND


In the PL/SQL code the function "apex_mail.get_instance" is executed which returns the URL for our APEX instance. The function "apex_page.get_url" returns an APEX navigation and builds with the previous function our whole URL.

Note:
Instead of using the "get_instance" function, you could also specify the URL directly in the "href" attribute. However, the "get_instance" function always returns the URL of the instance from which it has been executed. A direct URL input would be static and would have to be adjusted again and again. For example, if you have multiple instances (e.g. Dev, Test, and Production), using "get_instance" the URL will be dynamically generated and doesn't need to be changed for each instance in your code.


As you can see in the URL, we refer to page 2 and enter a parameter that we want to use there as a filter. In this example, we want to show the email log of the recipient on page 2. To make this possible we still need a new page, so let's create it quickly


Create a new page to display the mail log

So, click on "Create page" in the APEX-Builder and select "Report" and "Interactive Report" as page type. Set the page number to "2" and name it "Mail Log" for example. Navigation is not required, so don't create a new entry here. Finally, change the source type to "SQL Query" and enter the following SQL statement:

1
2
3
4
SELECT * 
  FROM apex_mail_log 
 WHERE mail_to = :P2_MAIL
ORDER BY last_updated_on DESC;
Note: If you want to know more information about mail logs or queues you can read the previous blog.

Since we are passing a parameter in the URL, we still need a page item for that. Therefore, create a hidden page item on the new page and name it "P2_MAIL". 

Finally, make sure that "Deep Linking" is enabled, otherwise you will not be redirected to this page if you don't have a session.


So there you have it. Let's try to send an email by clicking on the "Send email" button.


And this is what the result of the email should look like.


If you click on the link (button) now, your APEX application will be opened and the log will be filtered according to the email address.


Annotation

In this blog post, only the PL/SQL API was used for sending. Of course, you can also send in the same way using email templates. In this case, the URL would have to be set in a page item and implemented in the email template via a placeholder.


So, that's it...here is the link for the demo app.

Labels: ,

Monday, January 17, 2022

Checking the mail log and queue (APEX Mail #7)


As announced, here you will find most of what you need to know about sending e-mails with Oracle APEX. Let's continue with topic number seven.


#7 Checking the mail log and queue

In this blog post we would like to show you how to check which mails are in the queue, which ones have been sent successfully or if an error occurred while sending. 


Let´s start by creating (or modifying) a demo app

To avoid having to create a new application again, let's take the demo app from the previous blog post

First, we add another button on page 1, which then opens a modal dialog to display the log. So add a "Text and Icon (Hot)" button at the "Help" position. Name the button "LOG" and use, for example, "fa-info-circle-o" as the icon and "Log" as the label. If you want, set the type to "Danger" to make the button stand out. Finally, set "Action" to "Redirect to Page in this Application" and set "Target Page" to Page "3".

If you start the application now, it should look like this.


Create a new page to display the mail log

Next, we need a new page to display the mail log when we click the "LOG" button. So, click on "Create page" in the APEX-Builder and select "Report" and "Interactive Report" as page type. Set the page number to "3" and name it "Mail Log" for example. The page mode could be a "modal dialog", but choose what you want here. Navigation is not required, so don't create a new entry here. Finally, change the source type to "SQL Query" and enter the following SQL statement:


select * from apex_mail_log order by last_updated_on desc;


"APEX_MAIL_LOG" is a predefined view from which all mail activities can be read. The following attributes can be selected:


After the report page is created, duplicate the interactive report. Change the title to "Mail Queue" and enter the following SQL query as "Source": 


select * from apex_mail_queue order by last_updated_on desc;


"APEX_MAIL_QUEUE" is also a predefined view from which all mails that are in the queue can be read. The following attributes can be selected:


So there you have it. Let's try to view the email log.


In the following screenshot, an error was produced due to an invalid email recipient. So you can see if and why an error was raised.


Note:

  • The queue view is normally empty unless just before the queue was purged or an error occurred.
  • Now and then APEX will purged logs. If you want to avoid that, you will have to write logs into a separate table e.g. every night.

Optional

  • If you have chosen a modal dialog you can activate "Stretch to Fit Window" under Template-Options for a larger overview
  • For instance, "Collapsible" can be selected as the template for the interactive reports

But style the page according to your wishes :)


Here is the demo app for reference.


Quellen:

  • https://bit.ly/3njZtKP

Labels: ,

Tuesday, January 11, 2022

Display tabular data in an email (APEX Mail #6)


As promised, here's most of what you need to know about sending email with Oracle APEX. Let's move on to topic number six.


#6 Display tabular data in an email

In this blog post we would like to show you how to display tabular data in an email template. Surely there are several approaches, but with this one described here we have already achieved good goals. Our approach here is that we generate HTML code for a table using PL/SQL code. And now we’ll show you how we solved it ;-)


Let´s start by creating (or modifying) a demo app

To avoid having to create a new application again, let's take the demo app from the previous blog post

First, we add a new email template to this application. The easiest way is to copy the existing "Hello World" template (btw. another great feature of APEX 21.2). To do this, go to "Other Components" in the "Shared Components" section, select "Email Templates" and click "Copy". Then select "Hello World" under "Copy Email Template" and name it for example "Hello Report" ("New Static Identifier" will be generated automatically).

When this is done, the template must be edited. For that, go to the template details and replace the body html code with the following HTML code.


<p>Hello #CONTACT#,</p>
<p>this is an email sent from <strong>Oracle APEX</strong>.</p>
<br>
#REPORT!RAW#
<br>
<p>Best Regards</p>


Line number four is new with the placeholder #REPORT# and the appended "!RAW" for HTML escape. In this placeholder we will insert the HTML code for the tabular data.

For this we need a new "hidden" page item, which we will add on page 1 in the "Send email" region. For example, name it "P1_TABULAR_DATA".

Then we need a new dynamic action that will be executed when the page loads. Just name it e.g. "Create Tabular Data". Create a true Action that execute Server-Side-Code and enter the following PL/SQL Code. 


declare
   l_tabular_data VARCHAR2(32767 CHAR);
begin
   -- add table header
   l_tabular_data := l_tabular_data || '<table>'
                  || '<tr>'
                  || '<th>EMPNO</th>'
                  || '<th>ENAME</th>'
                  || '<th>DEPTNO</th>'
                  || '<th>DNAME</th>'
                  || '</tr>';

   -- add table data    
   for rec in (select empno, ename, deptno, dname from emp_dept_v)
   loop
      l_tabular_data := l_tabular_data || '<tr>'
                     || '<td>' || rec.empno || '</td>'
                     || '<td>' || rec.ename || '</td>'
                     || '<td>' || rec.deptno || '</td>'
                     || '<td>' || rec.dname|| '</td>'
                     || '</tr>';
   end loop;
   
   -- close table
   l_tabular_data := l_tabular_data || '</table>';

   :P1_TABULAR_DATA := l_tabular_data;
end;  


Note: For the tabular data, the tables EMP and DEPT and the corresponding view EMP_DEPT_V are required. You can install them under the sample datasets.


As you can read in the PL/SQL code, the HTML code for a table is generated. In the first step, the headers are written and then the data is written using a for loop. Finally, the HTML code is set into the page item.

The last step required here is to select "P1_TABULAR_DATA" as item to return.


So, all preparations are done!

In order to use the new template, we need another process on page 1. So copy the process "Send Email"  and name it, for example, "Send Email with tabular data". Then change the email template to "Hello Report" and add another placeholder -> REPORT / &P1_TABULAR_DATA.


To be consistent with the other processes, we will set the "Server Side Condition" so that this process is only executed when the "Send" button is clicked and the "Hello Report" email template is selected. Therefore, go to "Server-Side-Condition" and select "Send" as "When Button Pressed". Then set "Item = Value" as the type, "P1_EMAIL_TEMPLATE" as the item, and "HELLO_REPORT" as the Value.


So, that's it... Now let's start the application and try to send an email with a report. 
The email should look like this:


As you can see, we were able to add tabular data to the email template. That's good, but it doesn't look pretty at the moment. To beautify the report a bit and get it in shape, we can add some CSS rules.


The CSS rules are added when generating the HTML code for the report. To do this, we go into the PL/SQL code from the dynamic action on page load and replace the PL/SQL code to be executed with the following:


declare
   l_tabular_data VARCHAR2(32767 CHAR);
begin
   --add css styles
   l_tabular_data := '<head>'
                  || '<style>'
                  -- for table
                  || '.my_table {'
                  || 'font-family: arial, sans-serif;'
                  || 'border-collapse: collapse;'
                  || 'width: 100%;'
                  || '}'
                  -- for table-header  
                  || '.my_table th {'
                  || 'background-color: #eeeeff;'
                  || 'border: 1px solid #dddddd;'
                  || 'text-align: left;'
                  || 'padding: 8px;'
                  || '}'
                  -- for table-data
                  || '.my_table td {'
                  || 'border: 1px solid #dddddd;'
                  || 'text-align: left;'
                  || 'padding-left: 8px;'
                  || '}'                  
                  || '</style>'
                  || '</head>';

   -- add table header
   l_tabular_data := l_tabular_data || '<table class="my_table">'
                  || '<tr>'
                  || '<th>EMPNO</th>'
                  || '<th>ENAME</th>'
                  || '<th>DEPTNO</th>'
                  || '<th>DNAME</th>'
                  || '</tr>';

   -- add table data    
   for rec in (select empno, ename, deptno, dname from emp_dept_v)
   loop
      l_tabular_data := l_tabular_data || '<tr>'
                     || '<td>' || rec.empno || '</td>'
                     || '<td>' || rec.ename || '</td>'
                     || '<td>' || rec.deptno || '</td>'
                     || '<td>' || rec.dname|| '</td>'
                     || '</tr>';
   end loop;
   
   -- close table
   l_tabular_data := l_tabular_data || '</table>';

   :P1_TABULAR_DATA := l_tabular_data;
end;


Feel free here and create your own style according to your wishes.


If we run the application again and send us an email with tabular data, it should look like this:


Note:
  • provide a plain text alternative in case the recipient cannot receive HTML emails
  • a reference to a CSS file is not possible in this case


Here is the demo app for reference.


APEX_MAIL API:

You can also use this solution to send email using the APEX_MAIL API.
In this case, add the placeholder "REPORT" to your PL / SQL code.

For example:


begin
    apex_mail.send(
        p_to                 => :P1_TO,
        p_from               => :APP_EMAIL,
        p_template_static_id => :P1_EMAIL_TEMPLATE,
        p_placeholders       => '{' ||
        '    "CONTACT":'     || apex_json.stringify( :P1_CONTACT ) ||
        '   ,"REPORT":'      || apex_json.stringify( :P1_TABULAR_DATA ) ||
        '}'
    );    

    apex_mail.push_queue;
end;  


Labels: , ,